Rainwater harvesting with multiple (modular) barrels
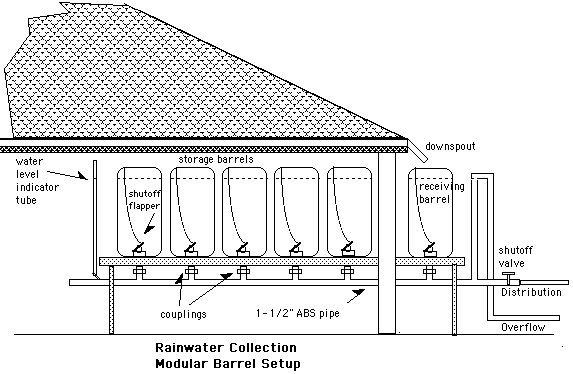
I'm dependent on water and I'm hooked on barrels. With one installed, I just had to have more. I added another, and another. Now I have seven connected barrels. This system of barrels, pipes and fittings has a water holding capacity of 350 gallons. The potential capacity is limited only by space available. The system supplies all of our outdoor watering needs in the summer, spring and fall, and also feeds a solar shower which is regularly used once the weather warms up. This is a good system for anyone who wants to optimize save and use rainwater, but doesn't have the resources or inclination to install a cistern and pump.
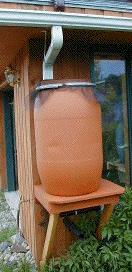
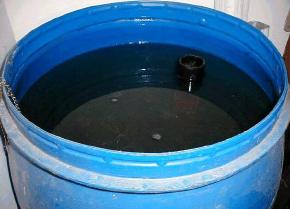
The first barrel I installed is the receiver barrel. It sits under the downspout from the eavestrough and collects all the water from the roof on one side of the house. The barrel is raised on a platform so the top of it is only 18" below the eavestrough. Raising the barrel off the ground means that more potential energy of the water is conserved and can be used to deliver the water by gravity to its destination. Also, the barrels and plumbing are easy to work on at this height. The top of the barrel is covered with nylon mosquito netting to filter out stuff from the roof and to prevent mosquitoes from laying eggs in the water. Our local fruit supplier sold us 45-gallon barrels for $10 each. These are food grade barrels used for cherries from Italy. They are good and strong and have not been contaminated with chemicals.
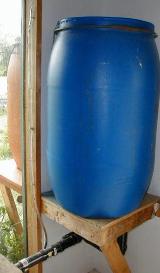
Five more barrels are located on a platform at the same height inside the garage (I later moved them OUTSIDE to get more room). All the barrels are connected together with 1-1/2" black rigid ABS plumbing pipe. The connecting pipe runs horizontally under the barrels and has vertical extensions which run up to and through the bottom of the barrels. In this way, all the barrels work as a single reservoir, filling and emptying together. Water enters the receiving barrel and flows through the plumbing to all the other barrels seeking its own level and maintaining the water at the same height in each one. The system is modular so you can add more barrels at any time. A new barrel can be located anywhere as long as it is at the same height as the others and can be connected at the base to the plumbing.
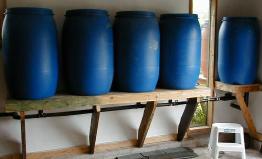
It is important to note that a barrel full of water is extremely heavy. Any platform constructed to support water barrels has to be very well constructed. One barrel containing 50 gallons of water weighs about 500 pounds. Five of our barrels that sit on one platform, when full, weight 2500lbs, well over a ton. Unless you are experienced at working with wood, consult a carpenter if you decide to build a support for your barrels.
To create the joint between each barrel and the connecting pipe we used the same device that allows water to flow from a toilet tank into the bowl. It consists of a short section of threaded pipe, about 2" in diameter which passes through the tank and a flapper that closes off the pipe until lifted by a chain when you flush the toilet. We added a couple of feet to the chain and, with a piece of wire, hooked it over the side of the barrel. Normally this flapper stays open but you can push it down and ---- if water is running out of the barrel -- it will stay down and close off the barrel. This makes a very cheap shutoff valve for each barrel which will not freeze and crack with a frost. If you want to work on the plumbing later (add a barrel, tap or more pipe), you can drain the pipes and keep the water in the barrels.
Once the barrels are operational, there is always great interest to see how much water there is inside! While it's fun to climb up and peer into them, we found a simple way to see the water level at a glance. The hardware store supplies a special dishwasher drain connector for about $3 which allows you to connect a flexible pipe to 1-1/2" drain plumbing. It's just like a regular "T-Y" joint which joins a drain line into a straight run of pipe, except that the drain line is only 1/2" diameter. We inserted this connector into our plumbing at a convenient place and then attached a length of clear plastic hose to the drain spigot on the connector. This hose is displayed vertically, say attached to the wall beside a barrel and rises just above the top of the barrel with the top open. Water rises up inside this tube to the same height as the water in the barrels and can be used as a level indicator. You can make pencil marks on the wall to show the level before a rainstorm or before you use the water in the garden and see how much the water rises and falls. There are lots of pencil marks beside our tube and we liked it so much we added a second tube outside in the garden. You can place a level indicator anywhere you like in the system and it will always tell you the height of the water in the barrels.
If you know the capacity of your system you can figure out how many gallons are represented by one inch on the level indicator. For example we have seven 50 gallon barrels, each 32" high (to the high water level), so we know that 32" represents 350 gallons of water. So a change of one inch in the water level represents roughly 11 gallons of water.
 |
This same principle of water seeking its own
level can
be used to set up your overflow.
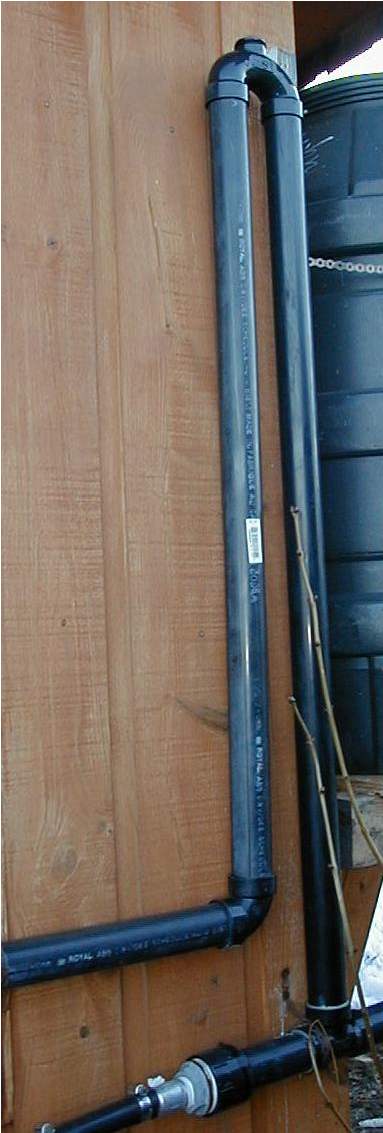
You must have an overflow unless you want to risk water rising up and pouring over the tops of your barrels in a good rainfall. All you have to do is set up a vertical pipe from the barrel plumbing, just like the level indicator. However instead of 1/2" plastic hose, the overflow pipe should be 1-1/2" diameter to accommodate a large flow of water. At the level of the maximum height of the water, say a few inches from the top of the barrels, connect a 90° elbow, or make a "U" joint, where you can then attach pipe to carry the water to a drainage location. To avoid a possible syphon effect that could drain your barrels, use a"U" joint as shown in the picture, and open or loosen the drain plug at the top. This will allow air into the system. Otherwise, when the overflow is working at capacity (filling the pipes), the weight of water in the overflow pipes could continue to draw water from the system after the level drops below the overflow height. This detail does NOT appear in the diagram at the end! Note that in a good storm, water may enter the system faster than it can be carried away by the 1-1/2" pipe, if you have a large roof area. If you adjust the height of the overflow to be several inches below the barrel tops, the barrel tops will act as a buffer, filling up to hold the excess water until it is carried away by the overflow. The more barrels you have, the greater the buffer size. |
Another way to set up the overflow is to set up a vertical overflow tube INSIDE one of the barrels. This could then be 2" instead of 1-1/2" and would carry a larger flow of water. This is how our system is built but it requires making a second hole in the bottom of one of the barrels. If you do this, the top of the 2" tube is left open, at the high water level, inside the barrel. Water rising above this will pour down into the open tube and be carried away through the bottom of the barrel to the drainage site of your choice, in the 2" pipe.
In either case, as all the barrels work together as
a single
reservoir, a single overflow determines the high water level for all
the
barrels in the system.
For final distribution of water to the garden, we reduced the 1-1/2" ABS to 1" utility grade plastic pipe. This is easy to work with. You can cut it with a knife, join it with couplings and clamps and it is flexible enough that you can even take it around a corner with a good radius. You do have to be careful not to kink it though. It's also cheap at about $16 for 100 feet. You can attach water taps to this pipe at convenient locations and connect a regular garden hose to the taps. Because of the height of the barrels, gravity will pressurize the system and allow you to water the garden from the taps with no pump or additional use of energy. Of course if your land slopes away from the house, you will have even more pressure at the end of the garden.
It feels great to recycle our rainwater into the garden. We have also added a solar shower to the system, located at the bottom of the garden and driven by the water in the rainbarrels. Our drinking water is supplied from a well and currently passes through a water softner and is quite alkaline. Most of the trees and plants in the garden prefer the rainwater (slightly acidic) to the house water and our well is less likely to run dry again. Now when we have a change in the weather and it rains, we have the extra enjoyment of knowing that we are filling up our barrels and replenishing our supplies of a vital and diminishing resource. We're all dependant on water and there are worse things to be hooked on than barrels!
NOTES. January 2009. After several years of use of this system, here are a couple of suggestions:
1. I have found it better to actually divert the water from the
barrels in the winter, rather than just open all the drain taps. This
is because we get a lot of thawing and freezing cycles during the
winter. So melted water (snow) from the roof will start to flow through
the system, then freeze. This has occasionally caused a couple of the
ABS pipes to crack. One winter, a collector barrel managed to fill with
water and freeze, then cracked by springtime. Now I have rigged up
alternative water routes for the downspouts that feed the barrels
during the winter months. You can actually purchase diverter sections
for some sizes of downspouts and I use one of these. It's shaped like
an inverted "Y" and you simply move a lever to direct flow from one
side of the Y to the other. You can lead the "waste" side wherever you
like, away from the house, for the winter months. These units are
somewhat pricey, if you can find them. At other places, I replace the
downspout with a different configuration to lead the water away from
the barrels. This works too, and just takes a little more time during
the winterizing process.
2. The chains that allow you to lift the shutoff flappers inside the barrels sometimes rust away after a couple of years. Now I make sure to use brass chains or even a nylon string that seems to last forever!
3. I used to use regular 1/2" taps and hoses to deliver the water in
the garden but became impatient at the rate of delivery. I have now
replaced all the 1/2" taps with 3/4" or 1" plastic ball-valve shutoffs
and replaced the 1/2" garden hoses with 3/4" pipe or hose. This
makes a WONDERFUL difference to the rate of delivery of the water. Like
a car battery, it has low voltage (pressure) but large amperage
(volume). I can now fill up a watering can as fast, or even faster from
the new tap and hose as from the pressurized hose from the house. I
would recommend this for any new system. Very satisfying!
![]()